places to go

Friday 24 December 2010

Hairy beast

so i finished the face and added some hair, unfortunately due to the many
layers of complexity of my hair. i.e.. the many colours. i managed to crash
3D studio Max several times performing this modifiers.

however here are the finished images

and here are the files.
i had issues putting them onto a disk
before deadline, hopefully having them here
to download will suffice


Friday 10 December 2010

Face


so this is my face apparently. there's a few more things to add like
bump mapping,
spectualrisation, and some other big fancy named things.
also my amazing hair cut, would be good to put that on there too.

Thursday 9 December 2010

Shopping The Photo


this is the unwrapped texture map.
its pretty silly looking but just you wait!


now I start adding bits of the reference photos
from step one!
literally just chunks, you add them in and blend
them together using the stamp tool and the
patch tool and some photoshop skills!


i look like a cyborg!


and done, it doesn't look pretty but i still have
lots of texturing to do, lighting and other stuff.
but that's on the next blog titled
rush to get this thing finished!

Ear Mapping

much the same as the face.
select the area.. bla bla blah!


but then... run a pelt map.. oOoooo
i dont know what it is but its got a funny name.


in the edit channel you hit relax!!
and you get this cool little moving skin thing
pretty sweet.


once its all stretched out. it will be added to the
UVW mapping texture and he presto into photo shop!!


UV Mapping

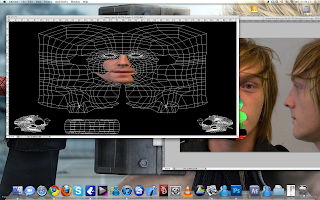
Firstly you have to put the view into left and change the
selection tool to spray, drop in an
Unwrap UVW modifier and select face.
you spray the areas you want to put the texture on apart
from the ear we cut that separately.

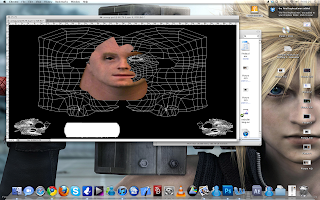
Then in Unwrap UVW modifier scroll down and select
cylindrical and position as i shown. simple you'd think but
i had umpteen green lines all over the shop.
not like in the tutorial video, this masalski is
starting to anger me!


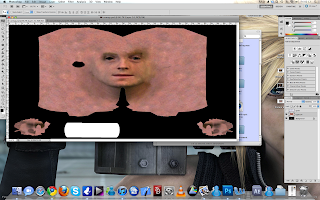
however after finally getting the above sorted
I dropped on a material and it worked perfectly
there was very little editing required, personally
I think this is down to my rocking Topology
supposed to dumb luck!


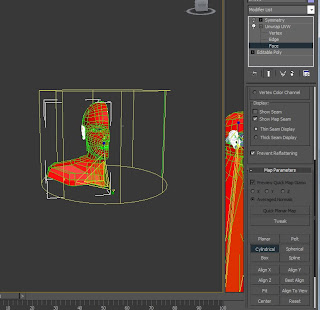
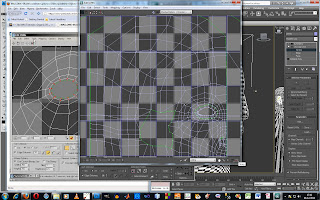
Ok so now i scroll down in the the UVW mod
and hit edit and open up the UVW mapping mod window
now in here the idea is to move around the vertices
so you have a smooth flowing texture map.
also you have to remove over hanging or over lapping
vertices as they can cause problems.

as i said before
i had an amazing topology so this was quick and easy
very little to do.


ok maybe a couple of bits here and there.


the eyes was easy, due to topology being good.


and the lips and nose. All in all this was
something i was dreading but it was relatively
simple there was only trouble getting past
all the green lines i had and selecting the
right faces but other than that it was quite easy!
one produced I attached it to the head. this I did
by using the snap tool and pushing vertices
together and using the weld tool to fix it together
then I selected everything and converted it
all to one Editable poly.
pretty hard and time consuming but it all
adds to produce the final result.
to make the over hang of the ear lobes and
other parts you use a chamfer to create an extra
set of polygons. this will allow you to extrude
the ear correctly and have the extra polygons
to allow the over hang to be produced.
The next big step is to make the ear,
its essentially the same process as with the face
you use the line tool to trace the topology.
connect the points using the snap tool.
You then convert this to a editable Poly
and extrude the vertices.
As you see its just a case of pushing it into
the right place, maybe modifying the
eye lid to fit the ball correctly
Now to move the ball into place
Now as I said there are some mods to do to make the texture work
from the drop down box selected a UV Mapping modifier
this positions it nicely
the next step is to play with the gizmo within the modifier
to adjust the size; height and width.
I dropped the texture onto the sphere.
I edited a texture and added a
bitmap to the diffuse channel
now it doesn't work that easily you have to make some
small mods to get it to position correctly and look good.
the next little bit to work on is the eye balls
basically a made a sphere shaped it to fit the
eye socket roughly
and i opened up my texture panel by pressing 'M'
After a lengthy process of pushing around
vertices i have completed the neck and shoulders
they work very well after running a
turbo smooth modifier

Wednesday 8 December 2010

3D Group Project: Story Bording!

3D Group Project: Story Bording!: "Breaking It down... 1.Active Essesx drops onto the screen and bounces twice, finishes slightly right of perspective, tress pop up and ..."

Monday 8 November 2010

Building a head!

Once the face mask was completed i
looked at constructing the head


firstly i spent alot of time making my face
surface smoother and a little more life like,
well more me looking :)


Now to make the skull.
for this you take a sphere shape
and squish it
into a skull shape.
by deleting the bottom half you have the top
of the cranium


then i used the clone (hold Shift) method
to pull sections down to make the
neck and throat.


the process is relatively simple. using the snap tool set to
vertex you can snap a lot of the extruded shapes to other
previously extruded shapes to get a nice overall shape. the
hard part is forming it to look like shoulders and a neck
a lot of trial and error is involved.

Next;
i will be making the shoulders and the neck and
going into more detail to make it look more realistic!

Friday 22 October 2010

With the Speed of the gods!

I've managed to get quite far in
two short hours

that have felt like a lifetime.

Ive reloaded the planes

Added the lines using the snap tool
converted to editable poly
the next step is to use your reference planes
to extrude the vertex of the polygon
to line up with the contours of your face.


Now im not complaining but this is tidious
and requires attention as not to deselected/selected
the wrong vertex point


TIME CONSUMING!
after a lot of pulling a lining up you have something like this.


right now im done on to the next section

which i believe is using the mirror or symetrey
tool to duplicate what I have

so I dont have to do it all over again!

you apply a symmetry modify from the drop down box
set your anchor point and pull it across
to line up with the middle seem


it looks like a japaneese kensi mask!
not my face
GheY!


Now a pro wrestle mask!

Out of all the options for making a mirror image using
the symetery tool offers the best results,
as i can edit one side and watch the mirrored side take an effect,
all in all its coming along pretty well.
after adding a couple of modifiers
such as turbo smooth and setting
the nurbs to smoothing it looks pretty good.

I'M GONNA KILL SOMEONE!!


so I clicked open new file not save, so I lost everything
and had to start again! I opened the original file but the
topology was set to the old [PSD] i had, so I've started again!

@%$&!

look at this bit of rubbish!

Re do Of Topooo


I re-did my Topology and this is the result,
hopefull now i have a lack of triangles
and such i should be in for an easier time!

My big FAT WHOOOPSIE!


WHOOOPSIE!!!


it turns out my topology wasnt that great so I
ended up with lots of silly little faults that I
couldnt correct, so i was advised by Richard
to start again! all very well but i have to be
handing this in soon!

Thursday 23 September 2010

MY FACE


Here we have some lovely photos
PROFILE and FACE
now I can do some Topology

This will it easier to render
my face in 3dStudioMax
the idea is to allow me to see and work out
the depths of things such as nose and eyes.
doing this will help me use the
quads more accurately and hopefully
produce a better end result


so I cropped my photo edited the two layers with
Filter>Distort>Lens Correction
so I know they are leveled, and sized perfectly
or as perfect as possible :)

next we do the layers of topology
they look a little something like this


with these complete we import them onto planes in
the 3dStudioMax and begin our rendering.

which will be in the next blogger update!!!

Wednesday 22 September 2010

Just made the face blog

this should be yet another interesting module